My kids LOVE paper air planes. No really. They waste so much of my printer paper folding and folding trying to make the best paper airplane EVER.
Over the years they have gone from the Klutz Paper Airplane book to studying how-tos on websites to combining their favorite folds to create their own paper airplane designs.
** This website contains affiliate links. If you make a purchase using one of these links, I may earn a commission. Please click here for more information about cookies collected and our privacy policy **.
Today, I am bringing you step-by-step paper airplane instructions for The Duck. Don’t ask where the name came from, who knows how the mind of a 12 year old boy works!
This plane works really well! It is a glider that uses wind to help keep it in flight longer and it does a few stunts- like loops before sailing over the grass.
After the instructions, I’ve included some tips for flying this paper airplane, PLUS a video to see it in action!

How to Make the Best Paper Airplane for Distance
I’ve provided step by step instructions for how to make this paper airplane design.
Sometimes pictures are easier to understand than words for learning how to create things! Let’s get started!
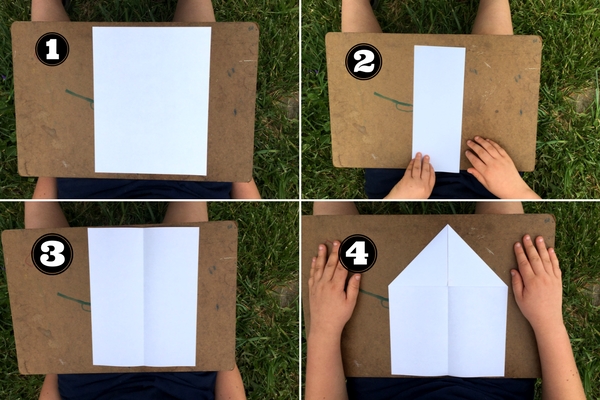
Take a standard sheet of 8 1/2 x 11 inch piece of paper.
Fold in in half long ways, then unfold.
Fold the top edges in so that they line up with the center line. At this point, this should look very similar to the most basic paper airplane design.
Fold the top point down so that it touches the bottom edge of the paper.
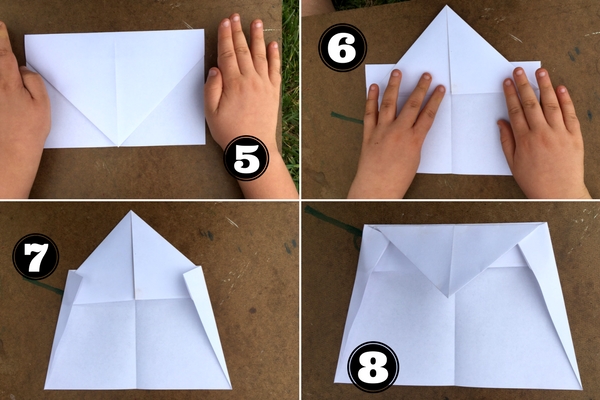
Then fold the point back up, starting about 1.5 inches from the top edge. (Shown in picture 6)
Fold the side edges in as shown in picture number 7.
Fold the top back down along the top edge of the folds made in the previous step.
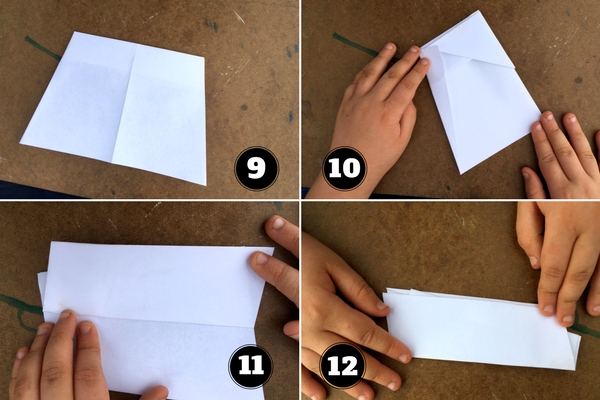
Flip the paper air plane over, and fold in half towards you.
Fold the the wing back as shown in image 11. The wing will be at a slight angle.
Flip over and fold the second wing in the same manner.
Crease well and you are done!
Tips for Flying this Paper Air Plane Glider:
- Throw the paper airplane with a medium weight- not too hard and not too soft
- Have the wings pointed slightly upwards
- Throw the airplane at a 45 degree angle
- The plane flies best standing on top of a hill, throwing down hill
- Fly the paper airplane with the wind direction
- This glider does best outside, where wind can offer some lift
You May Also Like: 20 Activities to Do With Your Kids this Summer
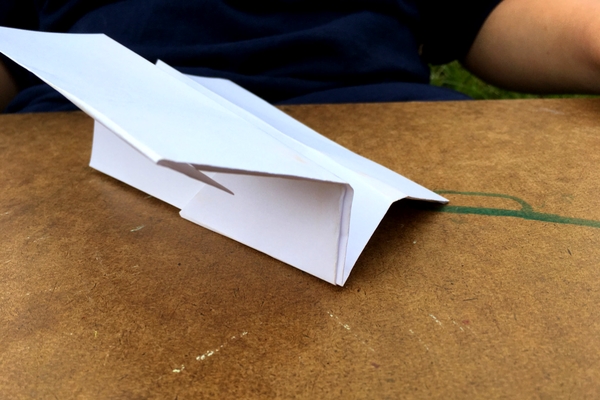
Paper Airplane Test Flight
Want to see this paper airplane glider in action?? Check out this video of a few of the test flights!
Isn’t it amazing?! Even my 2 year old could toss this one in the air and have it soar away! The kids made at least a half dozen of the same design to test and they all worked amazingly!
Try it out- let me know what you think!
*This paper airplane was created and designed by my 12 year old son, who wanted paper airplane that flies far. (Want to see more of his paper air plane designs? Check out his site Paper Airplane World!)
May I get some activities which I download and use
You lose me at 10-11. No idea what you’re talking about.
Step 10. Fold the paper in half so the folds from 6 to 8 are showing.
Step 11. Fold the wing down so it is even with the bottom of the plane.
Hope this helps!
Know the feeling I am the same lost at 10-11 no idea what this is, glad to see its not just me that is lost lol 🙁
Amazing flight!!!
IT TO HARD AT THE LAST STEP IT DO HARD
Holy cow, this plane is good =)
I made one of these for my 5yr old daughter. I told her and my 11yr old boy to take it outside and play with it…they have been out there for more than an hour 😁